PACK airgun safety rules: Point the airgun in a safe direction, Always assume it is loaded and charged or pumped with air, Check the safety target and back stop, Keep your finger off the trigger and outside the trigger guard until ready to fire.
Night Plinkers // Field Guide

How a PCP Airgun Works

Pre-charged pneumatics demystified — from fill port to first shot. Built for beginners and experienced plinkers alike.

What Is a PCP Airgun?

🔵 Think of a PCP like a scuba tank on your airgun. You fill the tank with air before you shoot — way more air than you'd ever get from a hand pump one shot at a time. Then every time you pull the trigger, it releases just a little burst of that stored air to send the pellet flying.

PCP stands for Pre-Charged Pneumatic. Instead of cocking a spring before every shot, a PCP holds a reservoir (a small metal tank) full of very high-pressure air. That air is loaded into the gun before you start shooting. Each pull of the trigger releases a small, measured puff of that stored air to launch the pellet.

The result: almost no kick (recoil), very consistent shots, and you can fire many times from a single fill. PCPs are the top choice for competition shooting and hunting.

2,900–4,350
Typical fill pressure (PSI)
PSI means "pounds per square inch" — it's how we measure air pressure. 2,900 PSI is roughly 80× the pressure in a car tire. The reservoir is specially built to hold it safely.
20–100+
Shots per fill
How many shots you get before you need to refill the air tank. A typical .22 PCP gives 40–60 good shots. After that, velocity drops and you need to top it up.
~0
Felt recoil
Recoil is the kick you feel when a gun fires. PCPs under .30 caliber have little to none — no heavy piston slamming around inside. Big-bore calibers (.35 and larger) produce noticeable recoil from the larger air volume and heavier projectile. Either way, it's far less than a powder-burning firearm of the same caliber.
±3–5
FPS spread (regulated)
FPS = feet per second, how fast the pellet travels. Spread means how much the speed varies shot to shot. A quality regulated PCP typically runs ±3–5 FPS shot-to-shot — very consistent and great for accuracy. Top-tier regulated guns (FX, Daystate, Air Arms) can reach ±1–2 FPS under ideal conditions.
New to PCPs? The most important thing to understand: you are NOT pumping air when you shoot — you already did that during the fill. The gun just controls how much of that stored air escapes with each shot.

PCP vs Springer

🤔 Choosing between a PCP and a springer is like choosing between a battery-powered toy (PCP — charge it up before you use it) and a wind-up toy (springer — wind it with every shot). Both work, both are fun — just different.

Both fire pellets. Everything else is different. Here's the honest breakdown.

⬤ PCP ⬤ Springer
Recoil Near-zero — tiny rearward pulse only
Scope-friendly
Double-recoil — piston forward, then back. Harsh on optics
Use springer-rated scopes
Power source Pre-filled reservoir (hand pump, dive bottle, or compressor)
Separate fill equipment needed
Spring / gas ram cocked per shot — self-contained
No fill gear required
Shot-to-shot consistency Excellent — especially regulated guns
±3–5 FPS regulated (±1–2 top-tier)
Good once technique is dialled — sensitive to hold
Hold-sensitive
Shot count 20–100+ shots per fill
Multi-shot magazines common
Unlimited — cock and shoot indefinitely
No refill needed
Maintenance O-rings, valve seals, periodic service — more internals
More parts to maintain
Spring / seal replacement. Simpler mechanically
DIY-friendly
Accuracy ceiling Very high — competition and hunting ready
No technique handicap
High — but technique-dependent. Harder to master
Springer technique required
Entry cost Higher — gun + fill equipment
Budget for fill gear
Lower — gun only
Lower barrier to entry
Noise Quieter — moderator-friendly
Suppressor compatible
Mechanical twang + muzzle blast
Moderators less effective
Bottom line: Springers are self-reliant and teach good technique. PCPs remove variables and reward consistency. Neither is wrong — they're different tools. Many shooters own both!

PCP Anatomy

🔍 Tap each numbered circle to learn what that part does and why it matters.

Before the detailed sections, take a moment to see the whole rifle. Tap any circle to learn what each major part does.

BRK Brocock Ghost PCP air rifle side view
Tap a numbered circle above.
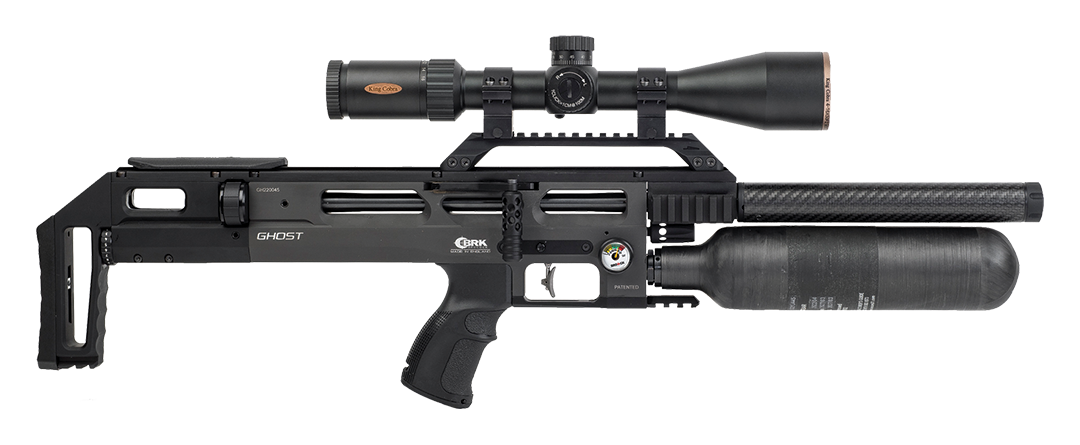
Each hotspot explains a major part in student-friendly language.
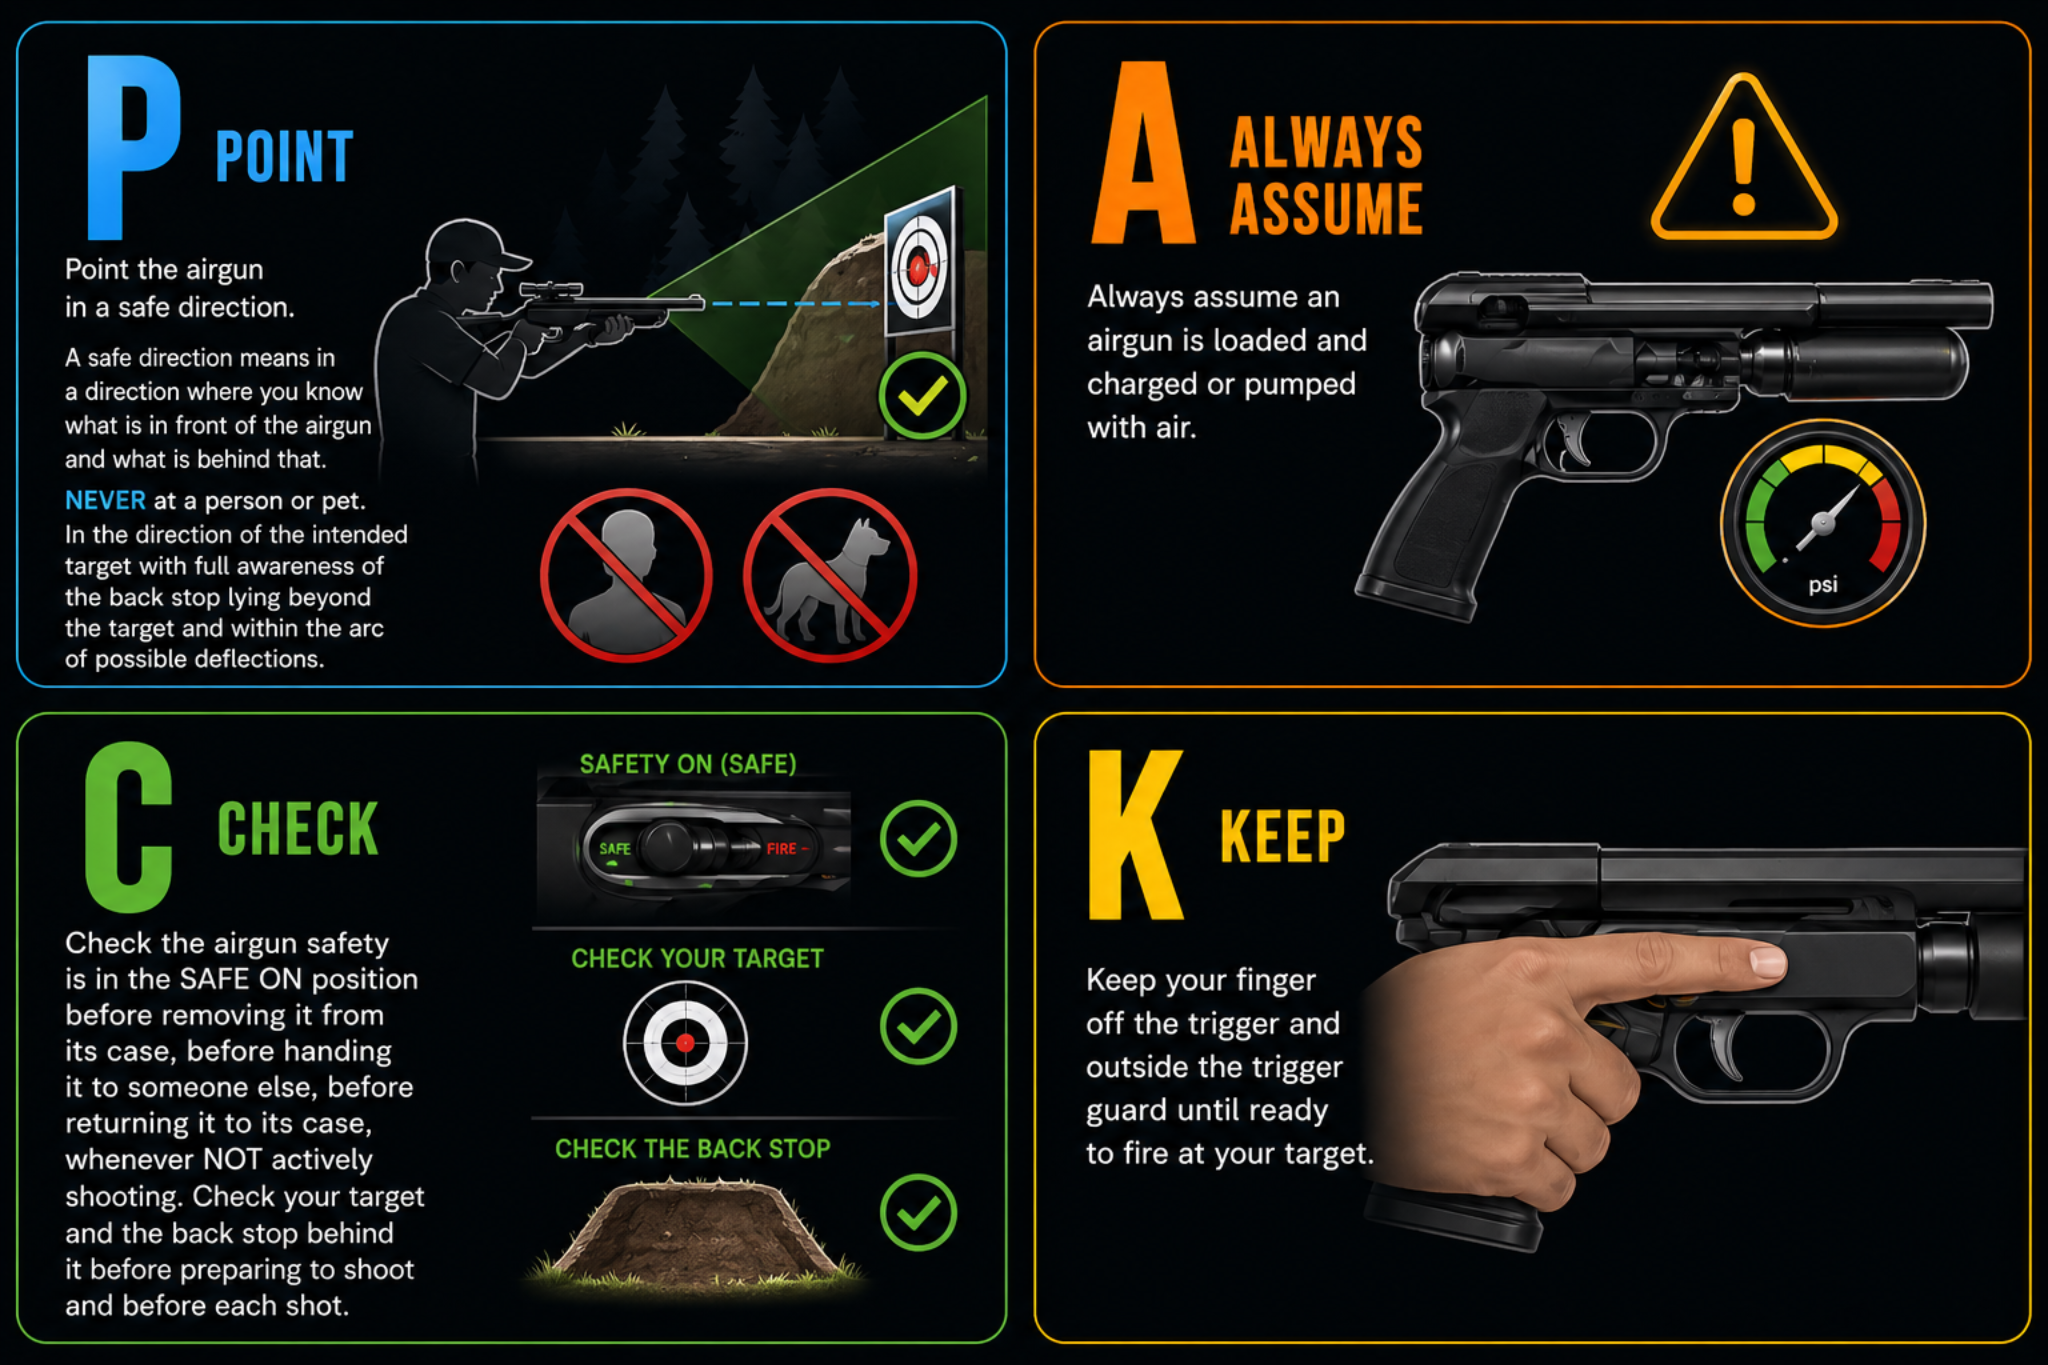
Pressure & Safety

⚠️ The air inside a PCP is under enormous pressure — way more than a car tire or a bicycle tire. That's what makes it powerful. But it also means you must check your gauge and never overfill. Drag the slider below to explore the pressure zones.

PCPs operate at pressures that demand respect. Understanding the zones on your gauge isn't optional — it's the first thing you learn.

2,900 PSI 200 bar LOW / SPENT
◂ DRAG TO EXPLORE ▸
0–1,450 PSI — Low / Spent
The gun can still fire but it's losing power. Your shots will start going slower and hitting lower. Time to stop and refill before accuracy gets bad.
1,450–3,335 PSI — Optimal Range
This is the sweet spot — your gun is firing at its best. Shots are fast, consistent, and accurate. Most of your shooting time should happen in this zone.
3,335–3,625 PSI — Near Max Fill
You're close to the maximum safe fill pressure for most rifles. Stop filling here unless your rifle's manual says it can handle more. When in doubt, stop early.
3,625+ PSI — Danger Zone
This is TOO MUCH pressure for most rifles. Overfilling can blow seals, break parts, or in extreme cases cause a dangerous failure. Never exceed the pressure printed on your rifle or in the manual.
Always check your rifle's rated fill pressure before connecting a fill source. It's printed on the reservoir or in the manual. A 2,900 PSI (200 bar) rifle does not become safer if you "just fill it to 3,335 PSI (230 bar)."
Never fill in an enclosed space. A catastrophic failure releases enormous energy. Fill outdoors, pointed away from yourself and others, with the barrel pointed in a safe direction.

The Regulator

📉 A regulator is like a water faucet that only lets through a set amount of water, no matter how full the tank is. In a PCP it makes sure each shot gets exactly the same amount of air pressure — so every shot is equally powerful.

A regulator is a pressure-reducing valve between the reservoir and the firing valve. It steps down the high reservoir pressure to a fixed, lower level — delivering the same working pressure to the valve on every single shot, no matter how full the reservoir is.

FPS 850 Shot 1 Shot 25 Shot 50 REGULATED — FLAT POWER CURVE ±2 FPS
Regulated guns drop the reservoir pressure through the regulator to a fixed setpoint — say, 1,600 PSI — before it reaches the firing valve. Whether the reservoir has lots of air left or just a little, the valve sees the same pressure every shot. This gives you tiny velocity differences between shots and a predictable number of shots per fill.
FPS Shot 1 Shot 25 Shot 50 UNREGULATED — BELL CURVE FPS RISES → PEAKS → FALLS ← SWEET SPOT →
Unregulated guns let reservoir pressure go straight to the valve. When the tank is very full, too much air comes out and the pellet actually slows down (too much pressure pushes the valve shut early). As pressure drops, the gun hits its "sweet spot" and fires at peak speed. Then velocity drops again as the tank empties. You tune the gun to perform best in this sweet spot.

The Fill Cycle

💨 Filling a PCP is like filling a bicycle tire — except the pressure is about 80× higher! There are three tools you can use to do it. Each one has its own steps. Pick a method below to walk through it.

There are three ways to charge a PCP. Each has its own workflow, pace, and practical trade-offs. Select a method to walk through it step by step.

Dive Bottle Fill Step 1 / 5
Step 01 / 05
Check the bottle pressure
Look at the gauge on top of your dive cylinder (the big metal bottle). If it reads higher than your rifle's fill pressure, you're good to go. If it's already lower than your rifle needs, you can't fully fill your gun — the bottle needs to be refilled at a dive shop first. Always check before connecting.
VALVECLOSEDDIVE BOTTLE( check pressure before connecting )12%RIFLE RESERVOIRSTEP 1: Is bottle pressure higher than your rifle’s fill pressure? If yes, proceed!
0RIFLE4,350 PSI
Step 02 / 05
Attach the fill hose
Screw the connector from your fill hose onto the dive bottle's valve by hand until it's snug — don't use tools, just hand-tight. Then push the other end of the hose (the quick-connect fitting) into your rifle's fill port until it clicks. Make sure the small bleed screw on the hose is turned closed (clockwise).
VALVECLOSEDDIVE BOTTLECONNECTED — not flowing yet12%RIFLE RESERVOIRSTEP 2: Hose screwed onto bottle, quick-connect clicked into rifle fill port. Bleed screw closed.
0RIFLE PRESSURE4,350 PSI
Step 03 / 05
Open the bottle valve — slowly
Turn the bottle valve slowly — a quarter turn, then pause and listen for any hissing from loose connections. Air will begin flowing from the bottle into your rifle's reservoir. Watch the pressure gauge on the rifle (or on the hose) — the needle should rise steadily toward your target fill pressure.
VALVEOPENDIVE BOTTLEAIR FLOWING →50%RIFLE RESERVOIRSTEP 3: Bottle valve open — watch the gauge rise steadily toward your target fill pressure
0↑ FILLING4,350 PSI
Step 04 / 05
Close the valve at target pressure
When the gauge needle reaches your rifle's rated fill pressure (check your manual — it might be 2,900 PSI, 3,335 PSI, or another number), turn the bottle valve closed. Don't keep going past that number. The pressure may nudge up slightly after you close it — that's normal and not a problem.
VALVECLOSEDDIVE BOTTLECONNECTED — not flowing yet87%RIFLE RESERVOIRSTEP 4: Gauge at target — close bottle valve. Don’t overshoot your rifle’s rated pressure!
0TARGET ✓4,350 PSI
Step 05 / 05
Bleed, disconnect, shoot
Turn the bleed screw counterclockwise to let the air out of the fill hose (you'll hear a short hiss — that's normal). Once the hissing stops, pull the quick-connect fitting off the fill port. Your rifle is now fully charged and ready to shoot. Close the bottle valve when storing it.
VALVECLOSEDDIVE BOTTLE≈≈≈BLEEDING HOSE — releasing pressure87%RIFLE RESERVOIRSTEP 5: Bleed the hose, pull off connector, store the cap. Rifle is fully charged! ✓
0CHARGED ✓4,350 PSI
Dive bottle pros: Fast fills (seconds), high capacity (dozens of fills per cylinder), quiet. Con: Bottles need periodic hydro testing and a dive shop or HPA compressor to refill.
Electric Compressor Fill Step 1 / 5
Step 01 / 05
Prepare the compressor
Check that the filters on your compressor are properly seated (these clean moisture out of the air). Make sure the output pressure is set to match or exceed your rifle's fill pressure. Connect the fill hose from the compressor output to your rifle's fill port.
■ READYELECTRIC COMPRESSORCONNECTED — not flowing yet12%RIFLE RESERVOIRSTEP 1: Filters seated, output pressure set, hose connected to rifle fill port
0START4,350 PSI
Step 02 / 05
Connect and start
With the bleed valve closed, turn on the compressor. It will start building pressure. These compressors are loud and get warm — that's normal. Make sure the room is ventilated and never walk away while it's running. Keep your face away from the connections while pressure builds.
RUNNINGELECTRIC COMPRESSORAIR FLOWING →25%RIFLE RESERVOIRSTEP 2: Compressor ON — never walk away. Watch for leaks at connections. Room must be ventilated.
0⚡ RUNNING4,350 PSI
Step 03 / 05
Monitor the fill
Keep watching the output gauge. Filling from low pressure can take 10–25 minutes — it depends on how empty the rifle is and how powerful the compressor is. Some compressors stop automatically when they hit a set pressure; others need you to watch and stop them yourself. Don't walk away.
RUNNINGELECTRIC COMPRESSORAIR FLOWING →52%RIFLE RESERVOIRSTEP 3: Filling in progress — 10 to 25 minutes from empty. Keep watching the output gauge.
0↑ FILLING…4,350 PSI
Step 04 / 05
Reach target pressure — stop
When the gauge hits your rifle's rated fill pressure, turn the compressor off or let the auto-shutoff do it. Don't add extra pressure just to top it off. Some compressors have a moisture drain on the hose — check your manual on how often to use it.
■ READYELECTRIC COMPRESSORCONNECTED — not flowing yet87%RIFLE RESERVOIRSTEP 4: Target pressure reached — compressor off. Don’t add extra ‘just in case’!
0TARGET ✓4,350 PSI
Step 05 / 05
Bleed, disconnect, cool down
Open the bleed valve to release the pressure in the hose (you'll hear a hiss). Disconnect from the fill port. Let the compressor run for another minute or two without load if it has a cooldown feature — this stops it overheating and makes it last longer. Store the hose in a dry place.
■ READYELECTRIC COMPRESSOR≈≈≈BLEEDING HOSE — releasing pressure87%RIFLE RESERVOIRSTEP 5: Bleed hose, disconnect, let compressor cool down before storing. Rifle charged! ✓
0CHARGED ✓4,350 PSI
Compressor pros: Fills from empty, no external cylinder needed, self-sufficient long term. Cons: Slow (10–25 min), generates heat and moisture, higher upfront cost, requires maintenance.
Hand Pump Fill Step 1 / 5
Step 01 / 05
Check pump and connections
Look over the pump for any damage or cracks. Make sure the bleed valve is turned closed and the gauge reads zero. Attach the pump hose fitting to your rifle's fill port — it should click or lock in place. You're now ready to start pumping.
HAND PUMPCONNECTED — not flowing yet12%RIFLE RESERVOIRSTEP 1: Pump checked, bleed valve closed, hose clicked into fill port. Ready to pump!
0START4,350 PSI
Step 02 / 05
Begin pumping — slow and steady
Use your body weight over the handle, not just your arm muscles — it's much easier that way. The first 50 or so pumps are fairly easy. As the pressure builds, each stroke gets harder. Rest after every 20 strokes so the pump doesn't overheat. It's a workout, but you can do it!
HAND PUMPAIR FLOWING →30%RIFLE RESERVOIRSTEP 2: Use body weight over the handle, not just arms. First 50 strokes are the easiest!
0PUMPING…4,350 PSI
Step 03 / 05
Work through the resistance
Above about halfway, every single stroke feels noticeably harder. That's normal — you're pushing air into a very compressed space. Keep your strokes slow and full. Check the gauge every 20 strokes to see your progress. Take your time and rest as needed.
HAND PUMPAIR FLOWING →52%RIFLE RESERVOIRSTEP 3: Getting harder — that’s normal. Full, slow strokes. Rest every 20 and check the gauge.
0↑ BUILDING4,350 PSI
Step 04 / 05
Approach target — slow final strokes
When you get close to the target fill pressure, slow way down and check the gauge after every stroke. It's easy to overshoot when you're tired and working hard. Stop exactly at the pressure number in your rifle's manual. Overfilling is a real risk at the end — take it slow.
HAND PUMPAIR FLOWING →78%RIFLE RESERVOIRSTEP 4: Nearly there! Slow down and check gauge after every stroke. Easy to overshoot here.
0NEARLY THERE4,350 PSI
Step 05 / 05
Open bleed, disconnect, rest
Turn the bleed valve open — you'll hear a short hiss as the pressure in the hose is released. Then pull the hose off the fill port. Leave the bleed valve open when you store the pump so the inside parts aren't stuck under pressure. Your rifle is charged — good job, catch your breath!
HAND PUMP≈≈≈BLEEDING HOSE — releasing pressure80%RIFLE RESERVOIRSTEP 5: Bleed valve open, disconnect, leave bleed valve open when storing. Rifle charged! ✓
0CHARGED ✓4,350 PSI
Hand pump pros: Portable, no power needed, lowest cost, fully self-sufficient in the field. Cons: Hard physical work, slow, pump seals need occasional maintenance, not practical for repeated top-ups.

The Big Idea: Stored Air Becomes Motion

A PCP airgun is called pre-charged pneumatic because its air is charged, or filled, before shooting. The air sits in a pressure vessel until the mechanism releases a controlled amount.

Air Bottle Regulator Valve Barrel pellet

The Shot Cycle

⚡ A PCP fires in less than 15 milliseconds — that's faster than the blink of an eye! Here's what happens inside the gun during those milliseconds, one step at a time. Watch the diagram above update as you step through.

A PCP fires in milliseconds. Here's what happens inside during that instant — step by step.

STOCK ACTION / CHASSIS BARREL MODERATOR BREECH SEAR / TRIGGER FILL PORT REGULATOR CYLINDER / RESERVOIR HAMMER VALVE STEP 1 — BOLT CLOSED, PELLET LOADED, HAMMER COCKED
Shot Cycle Step 1 / 5
Step 01 / 05
Bolt closed — pellet loaded
The bolt is pushed forward, which seats the pellet at the start of the barrel (the breech). The hammer is cocked back and held in place by the sear — like a loaded mousetrap, waiting. The valve is closed. All the air in the cylinder is just sitting there, waiting for the signal to release.
Step 02 / 05
Trigger breaks — sear releases hammer
You squeeze the trigger. This nudges the sear out of the way. The sear is a tiny metal hook that was the only thing holding the hammer back. When it moves, the hammer spring launches the hammer forward at high speed toward the valve.
Step 03 / 05
Hammer strikes the valve
The hammer slams into the valve stem and pushes it open for a very brief moment — just 5 to 15 milliseconds. During that tiny window, high-pressure air rushes out of the cylinder through the regulator, up the transfer port, through the valve and into the barrel behind the pellet. Then the valve snaps shut again.
Step 04 / 05
Air burst propels the pellet
The burst of compressed air shoves the pellet down the barrel at high speed. The barrel has spiral grooves called rifling cut into it — as the pellet travels through, these grooves make it spin like a football. That spin keeps it flying straight and accurate. By the time it exits, it's spinning thousands of times per second.
Step 05 / 05
Valve closes — cycle complete
The valve spring pushes the valve closed as soon as the hammer's energy is used up. Air stops flowing. The remaining air in the cylinder stays put, ready for the next shot. Now you cycle the bolt to load another pellet from the rotary magazine — and the whole cycle can happen again!

What the Parts Diagram Teaches
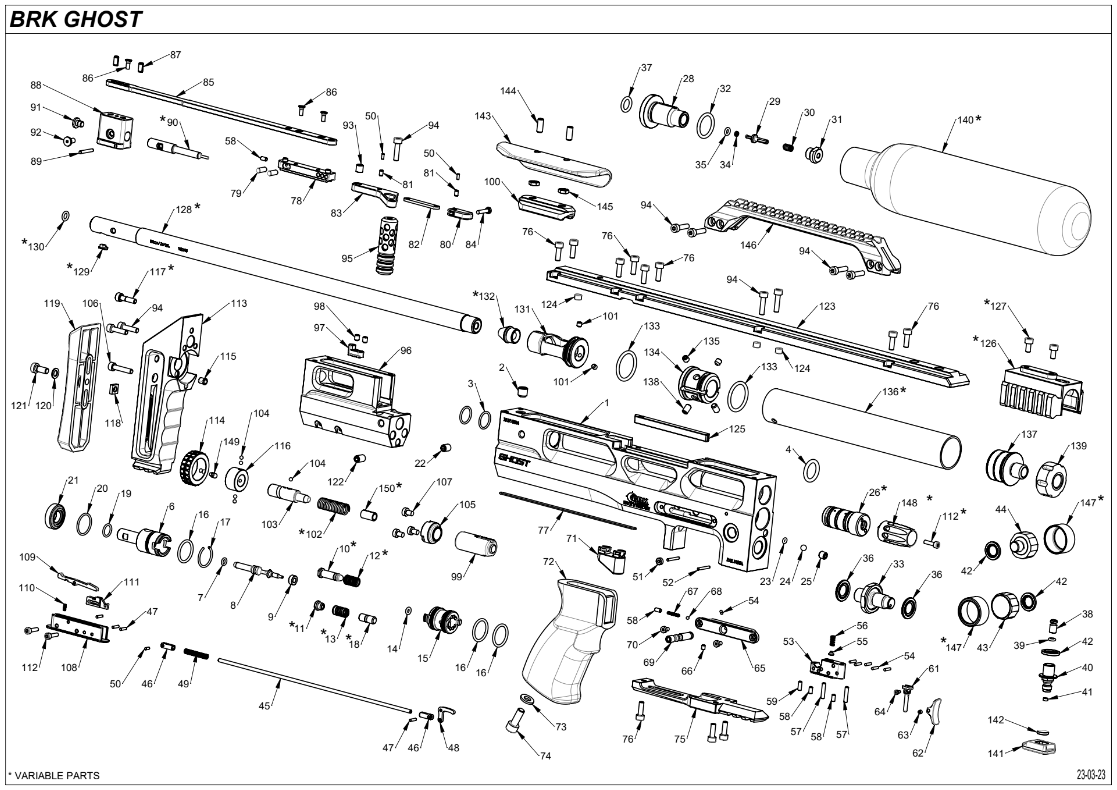
BRK Ghost exploded parts diagram
Exploded diagrams show parts separated so a technician can identify assemblies. They are not step-by-step youth disassembly instructions.

How to read it

The diagram shows that the airgun is made from many smaller systems: frame, barrel, air bottle, gauge, rail, trigger group, stock, fasteners, seals, and other internal parts. In class, students should focus on the systems, not memorizing every part number.

Why are there so many small parts?

Precision machines need alignment, seals, springs, screws, and safety-related components. A small part can have an important job, especially when compressed air is involved.

What are seals?

Seals help keep air from leaking. A simple comparison is a bicycle pump seal: if the seal fails, pressure escapes and the pump works poorly.

Why not take it apart in class?

PCP airguns contain compressed-air systems and precision parts. Disassembly should be done only by qualified adults following the manufacturer's instructions.

PCP Terms

📖 New to airgunning? Click any term below to learn what it means in plain English. Understanding the words makes everything else make more sense.

The jargon decoded. Click any term to expand.

Unit of pressure Both measure air pressure. PSI (pounds per square inch) is used in the US. Bar is the metric version used by many European manufacturers. 1 bar = about 14.5 PSI. A common fill pressure of 3,000 PSI is roughly 207 bar. Most PCPs list both units in the manual and on the reservoir. Always use the number your rifle's manual specifies.
Internal component A valve that reduces the high pressure in the reservoir down to a lower, fixed level before it reaches the firing valve. Think of it as a "pressure limiter" — it makes sure every single shot gets the same amount of air pressure, giving you consistent velocity from shot to shot. Regulated PCPs are more accurate and predictable.
Air chamber A small extra air chamber between the regulator and the firing valve. It acts as a holding space — storing a pre-measured amount of air at regulated pressure, ready to be released as one controlled burst when the valve opens. Think of it like a pre-loaded syringe of air waiting for each shot.
Internal component A heavy metal slug powered by a coiled spring. It sits behind the valve, held in place by the sear (a small metal hook). When you pull the trigger, the sear gets nudged out of the way and the spring launches the hammer forward. It slams into the valve stem, knocking it open just long enough for the air burst to push the pellet. Heavier hammer = valve open longer = more power per shot.
External connector The connection point on the side or bottom of the rifle where you attach the fill hose. It has a one-way valve inside so air can go in but can't leak out on its own. Always keep the dust cap on when you're not filling — it protects the seal inside. Check your manual to know which fill fitting your rifle uses before buying a hose.
Performance metric How consistent your shots are across a full tank of air. A regulated rifle's shots are all nearly the same speed — a flat line from start to finish. An unregulated rifle starts out slower, speeds up as pressure drops toward its "sweet spot," then slows down again as it runs out. Knowing your rifle's pattern tells you when to stop and refill before accuracy starts to suffer.
Tool / accessory A tool or built-in port that safely releases all the air from your reservoir — for example before carrying it in a car, or before servicing any part that holds pressure. Some rifles have a built-in button or screw; others need a special adapter. Important safety rule: never take apart any pressurised part. Always empty the air first.
Muzzle device A cylinder that screws onto the end of the barrel to make the gun quieter. It works by slowing down and cooling the air that rushes out after the pellet. PCPs work especially well with moderators because the air pressure is lower than a firearm. A good moderator can make the shot nearly silent — often the loudest thing you hear is the pellet hitting the target. Check your local rules before fitting one.
Gauge The pressure gauge built into or attached to the rifle's reservoir, showing current fill pressure. Lets you know at a glance how much air is left without guessing. Not all entry-level PCPs include one — without a manometer, you rely on the fill hose gauge. Having one on the rifle is a significant convenience during a session.

Interactive Check

Test your understanding. Select the best answer for each question.